Basic Functions
Retrobatch Window and Canvas
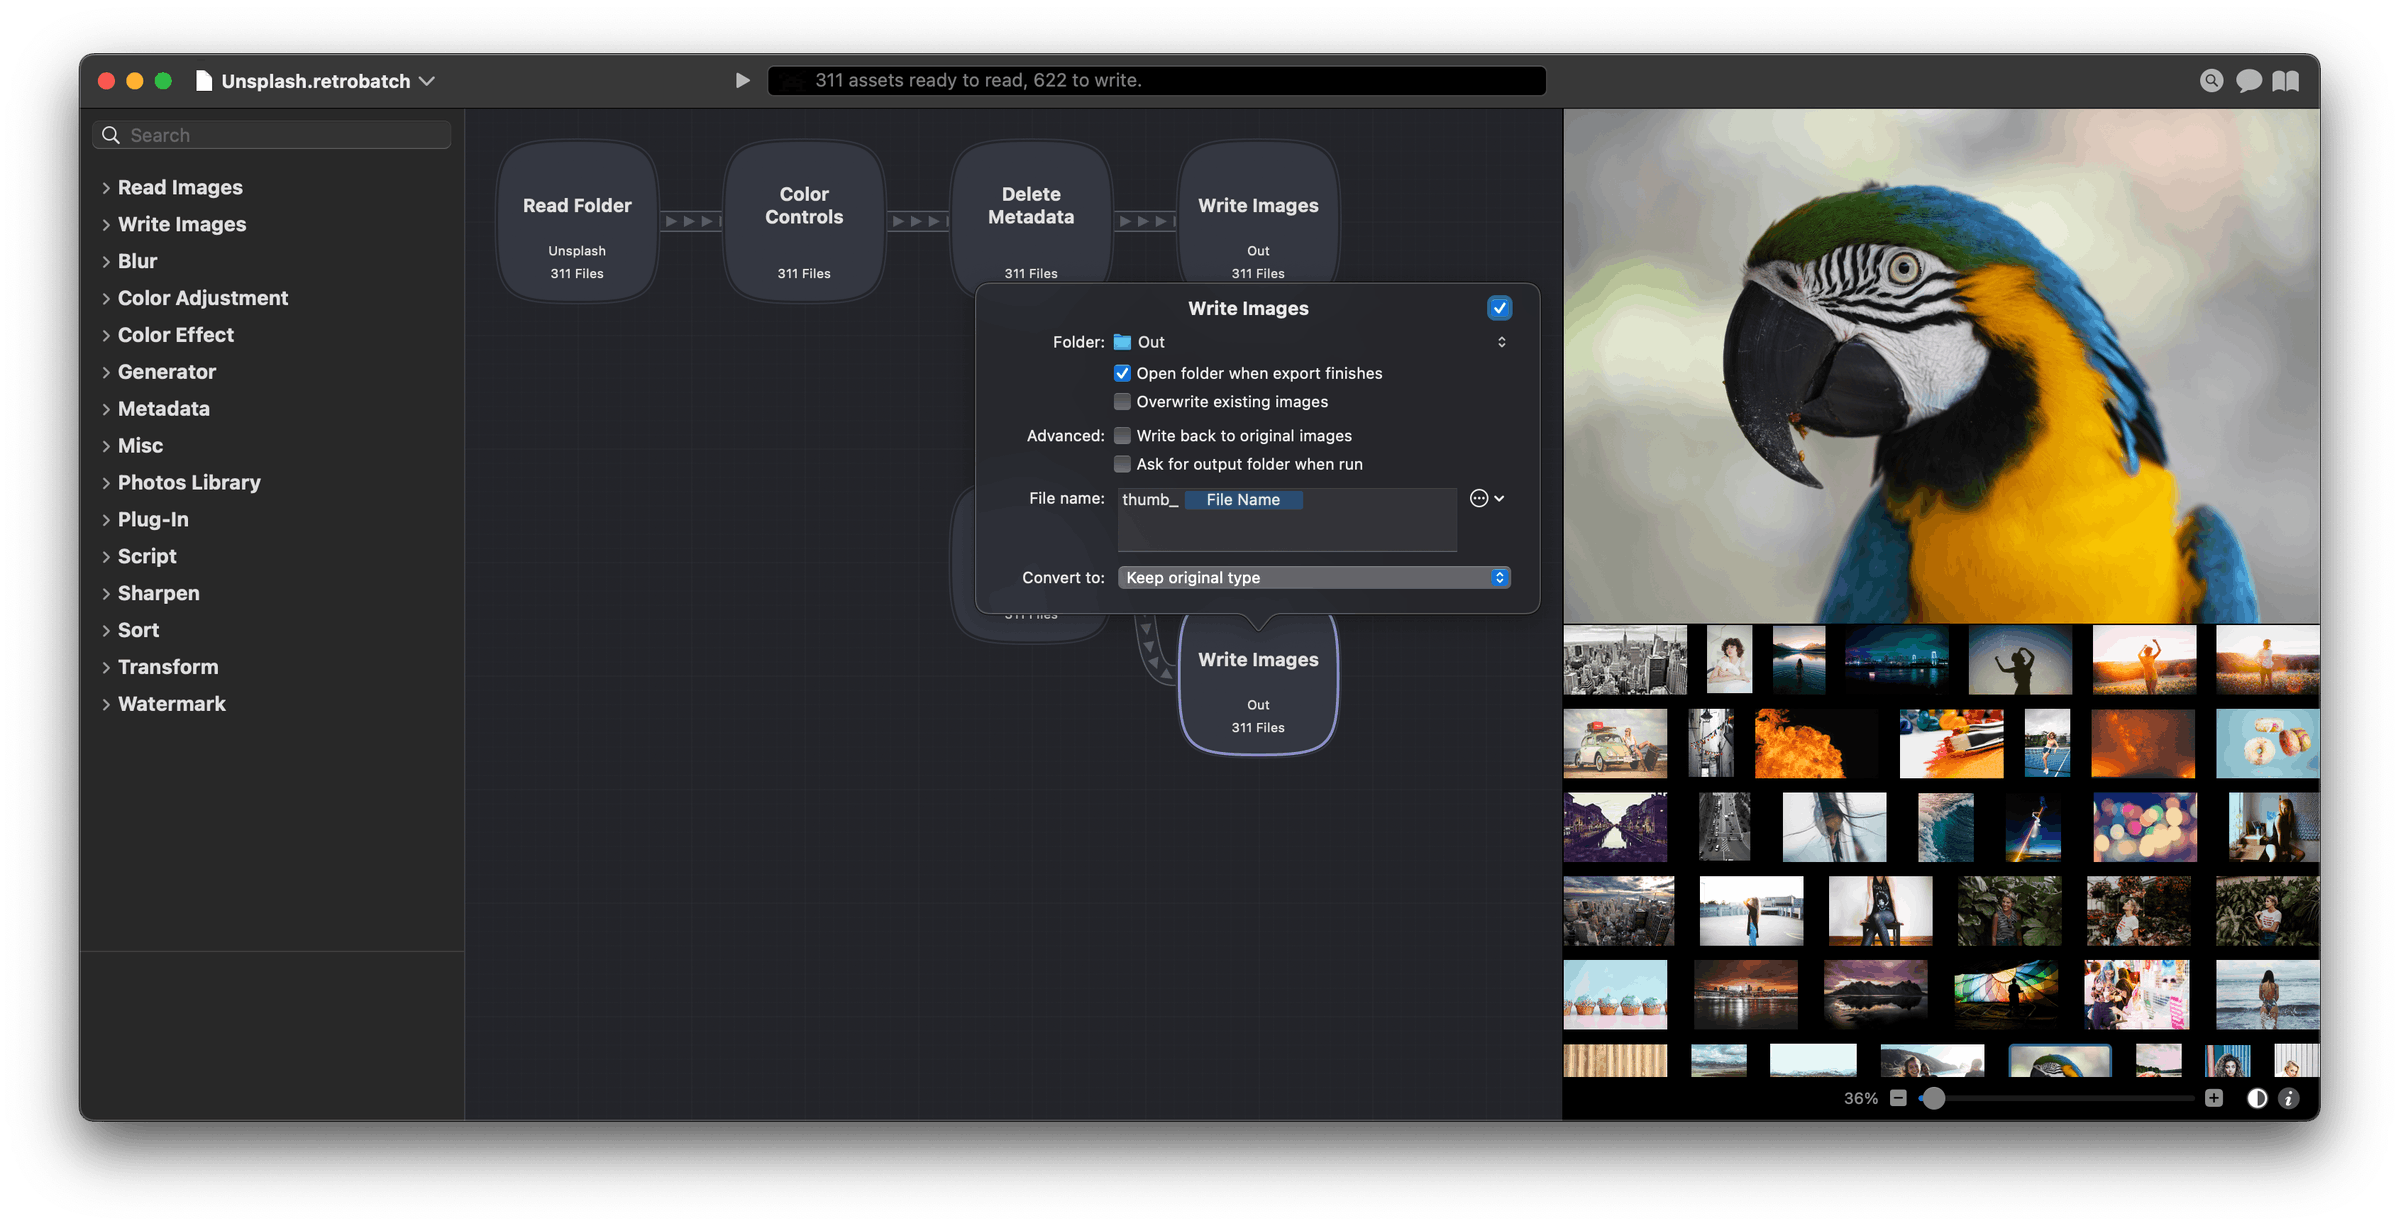
Left column: Node list organized by categories. Click on a category drop down arrow to see the available nodes. Use the search field at top of the column to search for nodes by name or description, or use keyboard shortcut ⌘F to shortcut to the search field.
Center: Canvas where nodes can be linked together to create a workflow.
Node popover: An inspector palette where the settings and adjustments of the currently selected node are displayed. Double click on a node in the canvas to bring up its node popover / inspector. A checkbox option to enable/disable nodes is present in the top right corner of the popover.
Right column: Image preview window and scrubber to scroll through images present in the workflow. Click on image thumbnails to bring up the image in the preview window. Underneath the preview window are the zoom magnification slider, preview background color toggle button, and image information button. Click the 'i' for specific image information including file size, file name, any classifications present (Pro version only), color profile, DPI, image size, and much more.
Top center: Run button and processing status bar. Clicking the run button executes a workflow. When a workflow is being run, the progress bar will give an ETA of when it will be completed. If critical pieces are missing in a workflow, a warning symbol will appear in the status bar. Clicking the warning symbol will provide more information.
Top right: From left to right - toggle big image preview, online forums, and online documentation buttons.
Top left: Close, minimize, and full screen buttons.
Adding Images and Folders to Retrobatch
Various options for adding images include:
-
Drag and drop a folder of images onto Retrobatch's canvas. A Read Folder node will be created.
-
Drag and drop a folder onto a "Read Folder" node and it will change its input folder.
-
Double click on 'Read Folder' in the lefthand node column. A Read Folder node will be created. Double click on the node to bring up its inspector palette. Click 'choose' to select a folder.
-
Drag and drop the 'Read Folder' text in the lefthand column onto the canvas. A Read Folder node will be created.
-
Drag and drop a single image onto Retrobatch's canvas. A 'Read Individual Files' node will be created.
-
Double click on 'Read Individual Files' node in lefthand node column. A node will be created. Drag and drop images onto this node or double click the node to bring up its popover. Click the '+' button in the inspector palette to select images.
-
Create a droplet. Use the File ▸ Save As Droplet… menu item to write out your workflow as an application. You can then drag and drop folders and images to run your workflow. To re-edit a workflow contained in a droplet, either hold down the option key when opening the droplet, or drag and drop the droplet onto the Retrobatch app icon.
Adding & Deleting Nodes in a Workflow
Options for adding nodes include:
-
Double click on the node name in the lefthand column, and the node will be added to the canvas.
-
Click and drag on the node name in the lefthand column and place it in the canvas.
-
On the menu bar, go to Edit ▸ Add Node and select a node. The node will be placed at the end of your workflow.
-
Right click or control click on the canvas, and a contextual menu will appear to select a node. The node will be placed wherever your cursor was located when you clicked.
-
To duplicate a node, hold down the option key while dragging on the node.
Read here for a list of available nodes.
Options for deleting nodes include:
-
Click on a node present in the canvas to select it, then hit the delete key.
-
Select multiple nodes by holding down the shift key while clicking on each node, then hit the delete key.
-
Delete all nodes in the canvas by clicking once on the canvas, then use keyboard shortcut ⌘A (or menu item Edit ▸ Select All) to select all nodes. Hit the delete key.
-
Click on a node in the canvas then go to the menu item Edit ▸ Delete.
Arranging Nodes in a Workflow
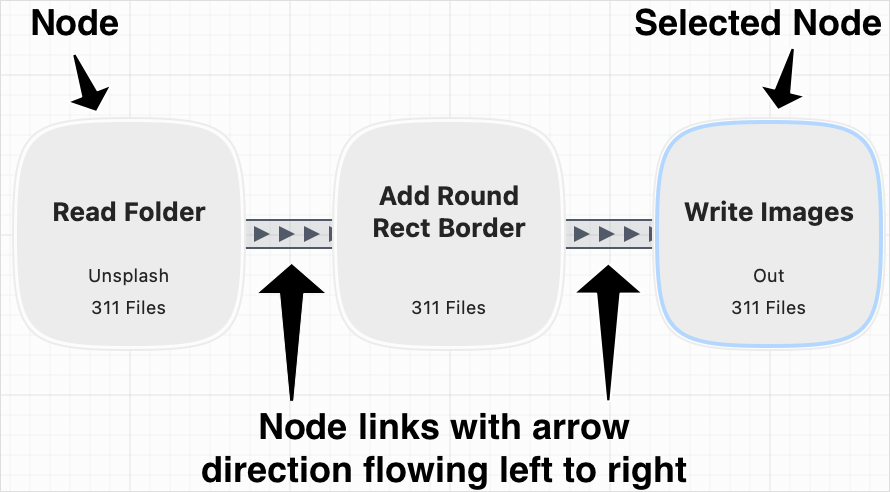
Workflows can be loosely created in a left to right configuration on the canvas. Click and drag on nodes to rearrange them in the canvas. Nodes can be linked to multiple other nodes to create branches in the workflow.
Linking Nodes:
-
When nodes are close enough, they will link.
-
To unlink nodes, drag one node away until the link disappears.
-
Retrobatch will process the nodes present by following the arrow direction shown in the links.
-
If the arrows are going the wrong direction, unlink the node and then move the node to the left or right.
-
In general, nodes preferentially flow in a left to right direction.
-
There is a preference to disable automatic linking for all workflows via Retrobatch ▸ Preferences ▸ General ▸ Default to manual connections with control drag.... Node connections will only be created by holding down the control key and dragging out a connection between two nodes. To delete a connection when this preference is checked, click on the connection itself to select it then hit the delete key. You will need to close and reopen any existing workflows for this setting to take effect. You can also turn this option on or off per workflow, via the View ▸ Document Settings… menu item.
Editing Node Values
The inspector palette for a node appears in a popover when you double click on the node. If you prefer to single click on a node to bring up its inspector, this can be changed via via Retrobatch ▸ Preferences ▸ General ▸ Double click nodes to show properties. The inspector palette shows available editing options for the currently selected node. A checkbox option is present in the upper righthand corner of the inspector to enable/disable the node. This tells Retrobatch if the node should be included when the workflow is run. Read here for further details on node capabilities.
Writing Images
Add a Write Images node to the end of a workflow. If there is no folder to write to when the run button is clicked, there will be no output (there are some exceptions to this). Retrobatch provides several prompts to notify you if a 'Write Images' node isn't set up:
-
If there is no Write Images node, an orange exclamation point will be present in the processing bar.
-
If there is a Write Images node, but no folder is selected, the node will have an orange border.
Adding the 'Open in App' node (Pro Version) after the 'Write Images' node results in the images Retrobatch has written opening in another selected app. The images passed to the app do need to have a representation on disk somewhere. For example, if you create the following workflow: Read Folder → Color Invert → Open in App → Write Images, you won't observe the color invert edits when the images open in the app, because they weren't written to disk prior to the Open in App node acting. The workflow would need to be Read Folder → Color Invert → Write Images → Open in App.
The 'Welcome to Retrobatch' Window
After opening Retrobatch, a welcome window will appear. To bring up this window again, go to menu item Window ▸ Welcome to Retrobatch. From here you can choose to create a new workflow, open an existing workflow, or select a template.